
Setting Up Your Linter In Sublime
Linters are time savers. They help spot syntax errors, undeclared variables, and make your code look consistent. This post will walk you through setting up a JavaScript linter that follows the popular Airbnb style guide in Sublime 3 (here is the Airbnb guide definition). Specifically, I will walk through installation of Package Control, SublimeLinter-jscs, SublimeLinter-jshint and Trailing Spaces.
Package Control
Sublime does not come with a package manager, so if you don’t have Package Control installed, go here and install it.
Once package control is installed, you should be able to press Shift+Command+P and then type in ‘install’ to get the ‘Package Control: Install Package’ option. This option will allow you to search for Sublime packages/plug-ins and install them in one click.

Later in this post, I will list the packages that I find helpful. But first, we will install the linting packages.
Sublime Linter
The first package we need is ‘SublimeLinter’. SublimeLinter will be extended with the JSCS and JSHint plug-ins.
- Launch Sublime, Shift+Command+P, choose ‘Package Control: Install Package’, type ‘SublimeLinter’ and choose it from the dropdown list to install the package. (Make sure it is just ‘SublimeLinter’ and not ‘SublimeLinter-*’)
JSCS
JSCS is a popular code syle checker/enforcer. Installing JSCS is a three-step process:
-
JSCS is a Node.js package, so first install it using npm. From the terminal, run
npm install jscs -gso that JSCS is globally available on your machine (if you are interested, readme is here). -
Next, to link JSCS to Sublime, install the ‘SublimeLinter-jscs’ plug-in by choosing it from the Package Control: Install Package list. [Note ‘SublimeLinter-jscs’ will only appear in Sublime 3.]
-
After SublimeLinter-jscs is installed, you need to specify the linting rules. The rules can be specified by directory (per project), but it is helpful to setup a default rules file that is applied to any JavaScript document that is a child of your home folder directory (and does not have a rules file). To setup a default rules file, just create a file in your home directory [~] called .jscsrc (make sure the file name is correct!) and paste in the following code:
{
  "preset": "airbnb",
  "disallowUnusedParams": false,
  "requireCamelCaseOrUpperCaseIdentifiers": false
}
JSCS has a really convenient “preset” option where many popular linting rule-sets are pre-defined. You can look at the presets in the JSCS readme, given above.
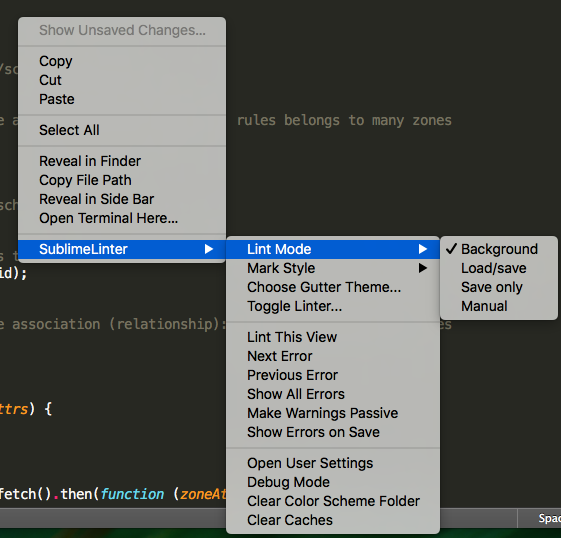
To ensure that that your code is linted as you type, you can right click on a document, choose Sublime Linter > Lint Mode > Background.
Now, let’s test if JSCS is working. SublimeLint will surround JSCS linting errors in faint yellow boxes and error messages will appear at the bottom of the Sublime window. A common linting error for Airbnb is spaces around parenthesis (so function() will throw a warning that you need spaces). Make this linting error and check for yellow boxes around your parenthesis like this:
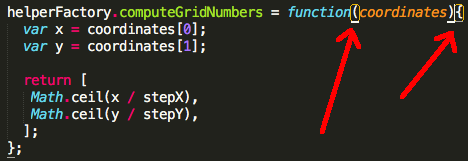

You should get SublimeLint to highlight the above linting error before proceeding. If you don’t see the above highlighted text, double check the spelling of the rules file (the path must be ~/.jscsrc).
JSCS is really helpful, but the style guidelines do not specify things like unused variables. To make your linting even more powerful, you’ll need JSHint, which is another linting tool.
JSHint
JSHint is yet another popular code syle checker/enforcer, but with slightly different rules than JSCS.
- To install JSHint, choose ‘SublimeLinter-jshint’ using the Sublime Package Control.
Just like JSCS, you need to create a default rules file that defines the rules for JSHint. To do this, just create a file in your home directory [~] called .jshintrc and paste in the following code:
{
 "node"     : true,
 "browser"  : true,
 "esversion": 5,
 "undef"    : true,
 "unused"   : true,
 "predef"   : ["$"],
 "globals"   : {
   "alert"                : true,
   "angular"              : true,
   "browser"              : true,
   "_"                    : true,
   "Promise"              : true
 }
}
Now, let’s see if JSHint is working. If you go back to a JavaScript document in Sublime, try to add extra unused variables and see if those are boxed in yellow as well, like so:
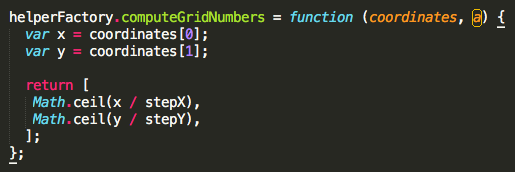

Once again, make sure SublimeLint is highlighting the above linting error before proceeding.
Trailing Spaces
Finally, the last package I would recommend is Trailing Spaces. This will highlight any spaces in your code. Spaces easily sneak by unnoticed, so this package helps.
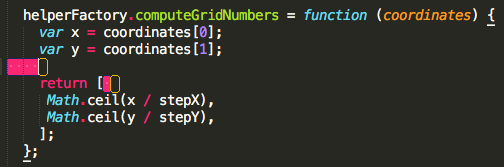
To install Trailing Spaces, choose ‘TrailingSpaces’ using the Sublime Package Control. Here is an example of how trailing space indicates where unnecessary spaces are located:
Now, you should have cleanly spaced code, fewer unnoticed syntax errors, no random spaces, and more time which you can use for coding!
Other Awesome Sublime Packages
Here are a list of other Sublime packages which are really useful:
- BracketHighlighter
- Git
- GitGutter
- Emmet
- SideBarEnhancements
- Terminal
- All Autocomplete
Enjoy.